
In my last post I introduced the field of image steganography, which is the practice of concealing secret messages in digital images. I looked at the history of steganography and presented some recently reported real-life cases (including one from the FBI) where digital steganography was used for malicious purposes.
In this post I would like to present to you the following two very simple ways messages can be hidden in digital images:
- JPEG Concealing
- Least Significant Bit Technique
These techniques, although trivial and easy to detect, will give you an idea of how simple (and therefore potentially dangerous) digital image steganography can be.
JPEG Concealing
Image files in general are composed of two sections: header data + image data. The header data section can contain metadata information pertaining to the image such as date of creation, author, image resolution, and compression algorithm used if the image is compressed. This is the standard for JPEGs, BMPs, TIFFs, GIFs, etc.
Knowing this, one can work around these file structures to conceal messages.
Let’s take JPEGs as an example. The file structure for this format is as follows:
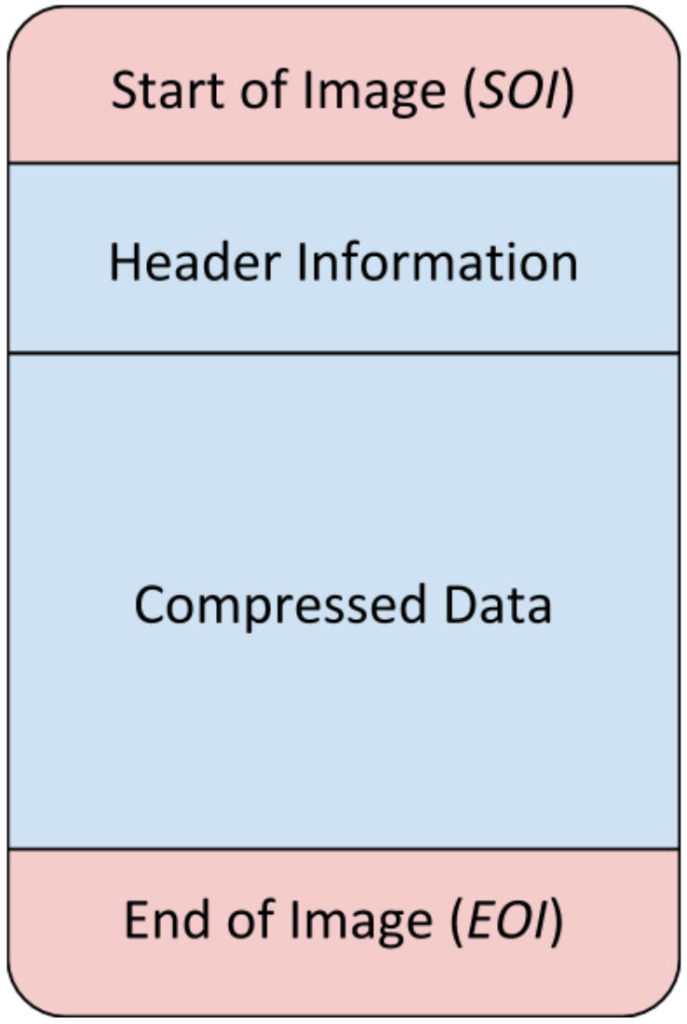
Notice that every single JPEG file starts and ends with the SOI and EOI markers, respectively.
What this means is that any image interpreting application (e.g. Photoshop or GIMP, any internet browser, the standard photo viewing software that comes with your operating system, etc.) looks for these markers inside the file and knows that it should interpret and display whatever comes between them. Everything else is automatically ignored.
Hence, you can insert absolutely anything after the EOI marker like this:
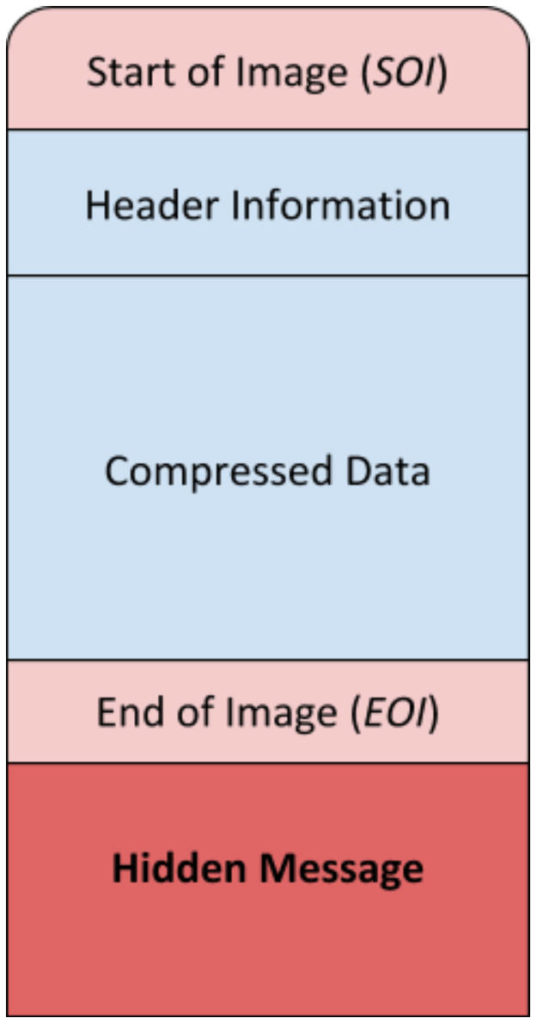
And even though the hidden message will be part of the JPEG file and travel with this file wherever it goes, no standard application will see anything out of the ordinary. It will just read whatever comes before EOI.
Of course, if you put a lot of data after EOI, your file size will increase significantly and might, therefore, arouse suspicion – so you have to be wary of that. In this case, it might be an idea to use a high resolution JPEG file (that naturally has a large file size) to turn attention away from your hidden message.
If you would like to try this steganography technique out yourself, download a hex editor for your machine (if you use Windows, WinHex is a good program), search for FF D9 (which is the hex version of EOI), paste anything you want after this section marker, and save your changes. You will notice that the file is opened like any other JPEG file. The hidden message simply piggy backs on top of the image file. Quite neat!
(Note: hexadecimal is a number system made up of 16 symbols. Our decimal system uses 10 digits: 0-9. The hex system uses the 10 digits from the decimal system plus the first 6 letters of the alphabet. To cut a long story short, hexadecimal is a shorthand and therefore much easier way to read/write binary digits, i.e. 1s and 0s. Most file formats will not save data in human readable form and we therefore need help if we want to view the raw data of these files – this is why hex is used sometimes used)
The Least Significant Bit Technique
Although easy to detect (if you know what you’re looking for), the Least Significant Bit (LSB) technique is a very sly way of hiding data in images. The way that it works is by taking advantage of the fact that small changes in pixel colour are invisible to the naked eye.
Let’s say we’re encoding images in the RGB colour space – i.e. each pixel’s colour is represented by a combination of a certain amount of red (R), a certain amount of green (G), and a certain amount of blue (B). The amount of red, green, and blue is given in the the range of 0 to 255. So, pure red would be represented as (255, 0, 0) in this colour space – i.e. the maximum amount of red, no green, and no blue.
Now, in this scenario (and abstracting over a few things), a machine would represent each pixel in 3 bytes – one byte for each of red, green and blue. Since a byte is 8 bits (i.e. 8 ones and zeros) each colour would be stored as something like this:
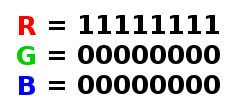
That would be the colour red (11111111 in binary is 255 in our number system).
What about if we were to change the 255 into 254 – i.e. change 11111111 into 11111110? Would we notice the difference in the colour red? Absolutely not. How about changing 11111111 to 11111100 (255 to 252)? We still would not notice the difference – especially if this change is happening to single pixels!
The idea behind the LSB technique, then, is to use this fact that slightly changing the colour of each pixel would be imperceptible to the naked eye.
Since the last few digits in a byte are insignificant this is where LSB gets its name: the Least Significant Bit technique.
We know, then, that the last few bits in each byte can be manipulated. So, we can use this knowledge to set aside these bits of each pixel to store a hidden message.
Let’s look at an example. Suppose we want to hide a message like “SOS“. We choose to use the ASCII format to encode our letters. In this format each character has its own binary representation. The binary for our message would be:
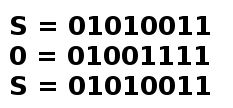
What we do now is split each character into two-bit pairs (e.g. S has the following four pairs: 01, 01, 00, 11) and spread these pairs successively along multiple pixels. So, if our image had four pixels, our message would be encoded like this:
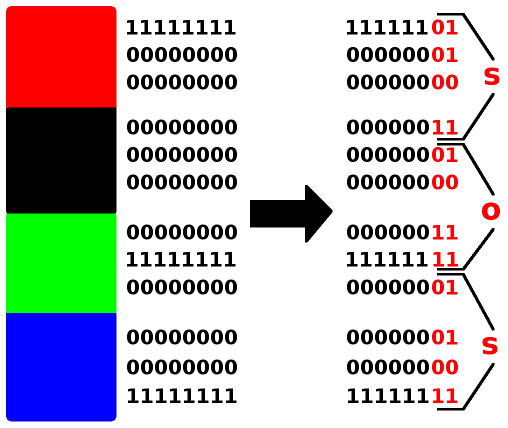
Notice that each letter is spread across two pixels: one pixel encodes the first 3 pairs and the next pixel takes the last pair. Very neat, isn’t it? You can choose to use more than 2 bits per pixel to store your message but remember that by using more bits you risk changes to each pixel becoming perceptible.
Also, the larger the image, the more you can encode. And, since images can be represented in binary, you can store an image inside an image using the exact same technique. In this respect, I would highly recommend that you take a look at this little website that will allow you to do just that using the method described here.
I would also recommend going back to the first post of this series and looking at the image-inside-image steganography examples there provided by the FBI. It shows brilliantly how sneaky image steganography can be.
Summary
In this post I looked at two simple techniques of image steganography. The first technique takes advantage of the fact that image files have an end-of-file (EOF) marker in their metadata. This means that any program opening these images will read everything up to and including this marker. If you were to put anything after the EOF, it would be hidden from view. The second technique takes advantage of the fact that slightly changing the colour of a pixel is imperceptible to the naked eye. In this sense, the least significant bits of each pixel can be used to spread a message (e.g. text or image) across the pixels in an image. A program would then be used to extract this message.
To be informed when new content like this is posted, subscribe to the mailing list:


One Reply to “Image Steganography – Simple Examples”